Monitoring SSH Bruteforce Attempts Using Splunk
I do lots of monitoring on my site (I’d rather watch logs than Netflix) which I’ll talk about in separate posts, but today I want to talk about SSH. I’m going to cover how I log, how I get those longs into Splunk, and what kinds of searches and alerts I have set up.
Getting Splunk to monitor SSH logs
First off, I’m running Ubuntu 16.04, and SSH natively logs to /var/log/auth.log. So the first thing I do is go to Settings –> Data Inputs –> Add Data within Splunk, and then add /var/log to the inputs. That basically makes it so that Splunk monitors every log file coming under that directory, which is most logs on an Ubuntu system.
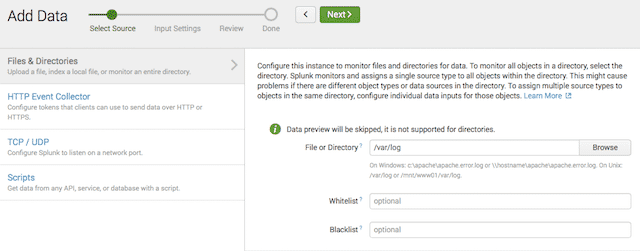
Image 1. — Telling Splunk to monitor a directory.
What questions are we asking?
The next thing to figure out is what we want to know about incoming SSH attempts. It’s a common problem within security that people just start making metrics without thinking about their questions first. My questions were:
Who’s trying to log in with an invalid user?
What user are they trying to use to log in?
Where are they coming from?
The first question requires us to look for invalid user entries in the logs. The second requires us to extract that user out of the log. And the third question requires us to get geolocation from the connecting IP address.
Performing the extractions
So within Splunk, there are a few tools that help us do this.
To find invalid users you simply search for entries like that in the logs, and the string happens to be, literally, "invalid user". You get some junk in those results which you can clean up with a couple of NOT statements, leaving you with the following search.

Image 2. — Your starting query.
This gives you results like the following:
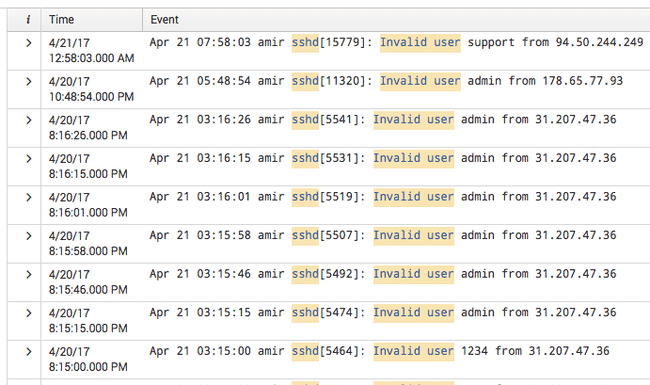
Image 3. — A basic search result.
This is decent, but we can do better. You can see that we have invalid users here in each entry—in this case admin, but the power of Splunk is taking fields inside of raw log files and turning those into actual fields you can manipulate and play with.
For that, we need to do some field extraction. To do that, click on the ">" in any individual search result, click the Event Actions pulldown, and select Extract Fields.

Image 4. — Starting a field extraction.
Extracting the user
First we’re going to extract the invalid user, and we do that by picking the Regular Expression option, selecting the word "admin" in the log, and saving it as SSHInvalidUser. Now we have that as a field, which looks like this in search.
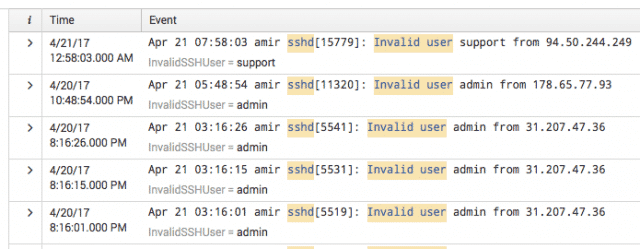
Image 5. — A result with the invalid SSH user extracted.
Getting geo information
Now to figure out who’s launching these attacks against us, we’re we need to convert that IP address we see into a location. Splunk does this automatically now with a built-in function called iplocation. But first we need to extract that IP into a variable of its own.
So we go through the process above and select the IP address this time, and save it as InvalidSSHIP. So now we have two different variables stored: InvalidSSHUser, and InvalidSSHIP
Then we add the following to our search query: | iplocation InvalidSSHIP, which looks like this.

Image 6. — Search results with geo information.
Which then gives us these interesting new options to the left of the results.

Image 7. — New field labels.
We now have "City" and "Country" as options, and further down we have "Region" as well. So Splunk has automatically translated all those IPs into locations.
Adding fields to search results
Now that we have all these fields extracted, let’s add them to the search output. Just click the "All Fields" button to the left, and select the ones we’ve created. Results now look like this:
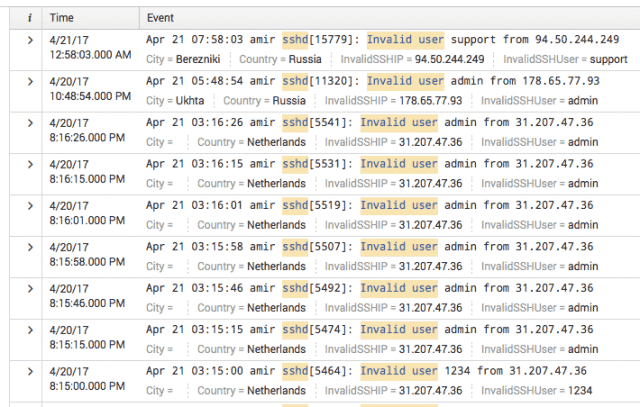
Image 8. — Search results with all fields visible.
That’s coming along nicely. We can now see the country, the city, and the username they tried to log in with!
Using Splunk’s analysis capabilities
Now that we have the components in place, we can start having fun with what Splunk does for us automatically. The fields to the left area all clickable.
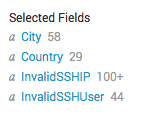
Image 9. — Clickable field names.
And when you do click on them, they expand out into a statistical view.
Viewing by country
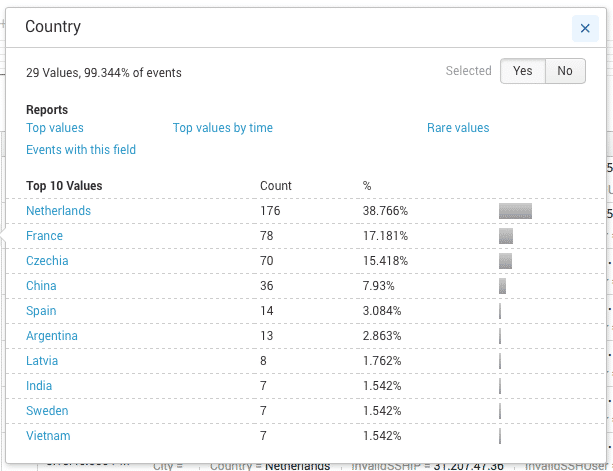
Image 10. — Top attacking countries.
Viewing by invalid username
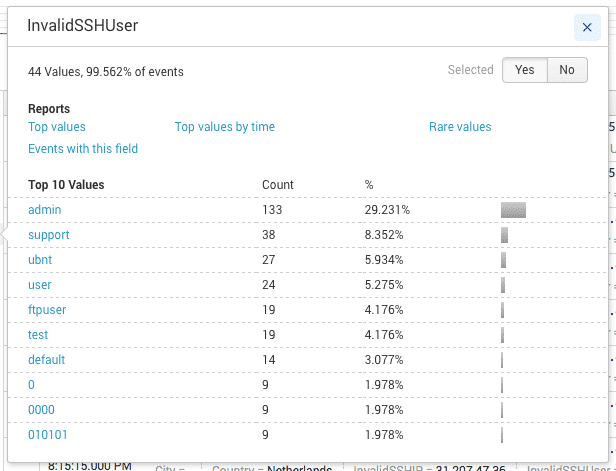
Image 11. — Top attempted usernames.
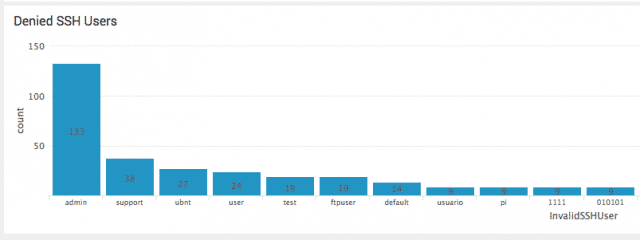
And then finally, graphing the results by clicking "Top values" in one of those boxes.
A graphical view of most common attempted users
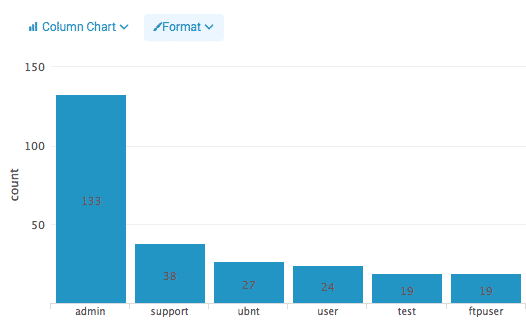
Image 12. — Top attempted users shown as a bar chart.
Summary
Bottom line here is that it’s possible to do all kinds of fun stuff with default SSH logs, a free Splunk installation, and just a few minutes.
Happy hunting.
Notes
I didn’t mention how to install Splunk on Ubuntu, but it’s basically a two minute process. You download the latest .deb package from the Splunk website and do dpkg -i $PACKAGENAME. That’s it.
I don’t work for Splunk nor have any relationship with them. If I did I’d say so clearly at the top when I mentioned the product. I’ve just loved and used the product for years.