How to Install Suricata on a Linux Box in 5 Minutes

It’s annoying to me that package managers are so bad at deploying Intrusion Detection systems like Snort and Suricata. They never seem to work the way they should, so I prefer to build from source and configure them myself. And it’s actually super easy.
Here’s how to go from nothing to a working Suricata install—on any modern Linux system—in just minutes.
1. Get the software
It will be here: https://suricata-ids.org/download/ (download the Linux version, which is a tarball).
2. Expand the software:
tar xvzf suricata-$VER.tar.gz
3. Enter the software directory
[ NOTE: We will now refer to whatever your directory is named (based on version) as suricata-dir. ]
cd suricata-dir
4. Compile, build, configure, and install the software
There are some great built-in options for doing lots of configuration automatically, such as creating the required directories, building your suricata.yaml file, and downloading the latest Emerging Threat > ruleset.
./configure –prefix=/usr –sysconfdir=/etc && make && make install-full
5. Set permissions
You don’t want to run your IDS as root because…well, because parsers.
So let’s do some hygiene real quick to run as an unprivileged user:
# Create our user
adduser suri
# Create our group (might already exist)
addgroup suri
# Add user to our group
adduser suri suri
# Give our user rights to log
chown -R suri:suri /var/log/suricata/
6. Start the IDS in daemon mode
Now that we’re installed, we can just run the IDS and put it in daemon mode.
LD_LIBRARY_PATH=/usr/local/lib /usr/local/bin/suricata -c /etc/suricata/suricata.yaml -i eth0 -l /var/log/suricata –user=suri –group=suri -D
This will:
Start the IDS using the config file we just created
Use the eth0 interface
Set the IDS to run as suri instead of root
Log to /var/log/suricata/fast.log
6. Check out some logs!
Now that we’re running, we should have logs to look at.
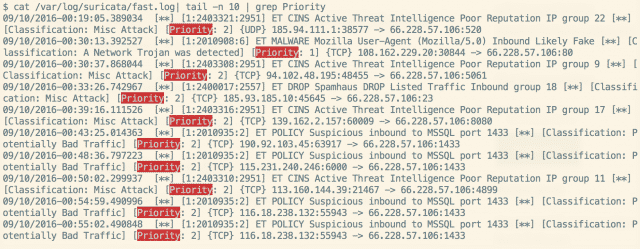
tail -f /var/log/suricata/fast.log
If you have a busy server you should see logs come in fairly quickly. If you don’t have a busy server, and you want to test if it’s working, scan the box with nmap and you should see some events.
Summary
Ok, that’s how to get a working IDS installation on a Linux box in less than 5 minutes. It works on any Linux distro because it’s source-based instead of package-based.
In the next part of this series I’m going to talk about how to:
Keep your ruleset up to date
Do some cool stuff with your logs
Set up alerts for high-priority events
More!