Building an IDS on CentOS using Suricata
I think I may have just switched from Snort to Suricata. ~ Me, About 40 Minutes Ago
One of the things I like to have on my internet servers is a basic Intrusion Detection System (IDS). This tells me interesting things like:
If I’m being portscanned
If malicious IPs are talking to me
If there is any malware detected in my traffic streams
If C2 traffic is detected in my traffic streams
If people are attempting to hack me through web traffic
If people are brute forcing my SSH daemon
Etc.
For over a decade I’ve been using Snort for my IDS on Linux systems, but for the first day of the new year I wanted to try something different.
[ NOTE: It’s also quite annoying that in order to install Snort you still need lots of alcohol and lots of patience. Not to mention great troubleshooting skills. In 2015 you should be able to run yum install snort and be three minutes from a running config. But you can’t do that. Not even close. I can make it work, but it takes over an hour of troubleshooting. Every. Single. Time. ]
So I gave Suricata > a try tonight, and I had it up and running in less than 30 minutes. I captured the steps to save you some time.
Getting the software
Make sure you have EPEL:
sudo rpm -Uvh http://dl.fedoraproject.org/pub/epel/6/x86_64/epel-release-6-8.noarch.rpm
Prerequisite software:
yum -y install libpcap libpcap-devel libnet libnet-devel pcre
pcre-devel gcc gcc-c++ automake autoconf libtool make libyaml
libyaml-devel zlib zlib-devel file-devel
Make your Suricata directory:
mkdir /etc/suricata
Download and install Suricata:
wget http://www.openinfosecfoundation.org/download/suricata-2.0.5.tar.gz
tar -xvzf suricata-2.0.5.tar.gz
cd suricata-2.0.5
./configure && make && make install-full
[ NOTE: That last bit—make install-full— is remarkable in how much it configures for you on its own. It basically downloads and sets up your rules and gives you a nearly running system. ]
Configuration
Link your configs:
sudo cp classification.config /etc/suricata
sudo cp reference.config /etc/suricata
sudo cp suricata.yaml /etc/suricata
[ NOTE: the Suricata docs are phenomenal. Much better than Snort’s I’d say. All I did was follow the instructions really, using some knowledge from my Snort experience. ]
Set your HOST OS Policy in /etc/suricata/reference.config:
host-os-policy:
  linux: [your.ip.goes.here/8, "8762:2352:6241:7245:E000:0000:0000:0000"]
Get Oinkmaster from:
http://prdownloads.sourceforge.net/oinkmaster/oinkmaster-2.0.tar.gz
[ NOTE: Oinkmaster is a rule management system. It’s super light, no big deal. ]
Create a directory for Oinkmaster in /etc/:
mkdir /etc/oinkmaster
Decompress the Oinkmaster tarball into /etc/oinkmaster, and then edit /etc/oinkmaster/oinkmaster.conf to add the following line:
url = http://rules.emergingthreats.net/open/suricata/emerging.rules.tar.gz
[ NOTE: These Emerging Threat rules are free rules supported by the community that keep up with the latest threats, and they’re updated daily. ]
Then you run oinkmaster.pl to download and install the rules:
/etc/oinkmaster/oinkmaster.pl -C /etc/oinkmaster/oinkmaster.conf -o /etc/suricata/rules
Then you tweak your rules you want to run in Suricata’s conf file. I start with these and then add from there:
botcc.rules
compromised.rules
dshield.rules
emerging-attack.rules
emerging-currentõevents.rules
emerging-malware.rules
emerging-scan.rules
emerging-shellcode.rules
emerging-trojan.rules
emerging-worm.rules
Remember to set your $HOMEõNET variable in /etc/suricata/suricata.yaml, and make sure you are logging to /var/log/suricata, and that the directory exists.
Starting up
You should be all set. Run the command with the --init-errors-fatal option at first to see if there are any issues.
suricata -c /etc/suricata/suricata.yaml -i eth0 --init-errors-fatal
Then once that’s working, remove that piece and add the -D option to run in daemon mode.
suricata -D -c /etc/suricata/suricata.yaml -i eth0
Now check to see if you have logs in /var/log/suricata/fast.log
tail -f /var/log/suricata/fast.log
You should see something like:
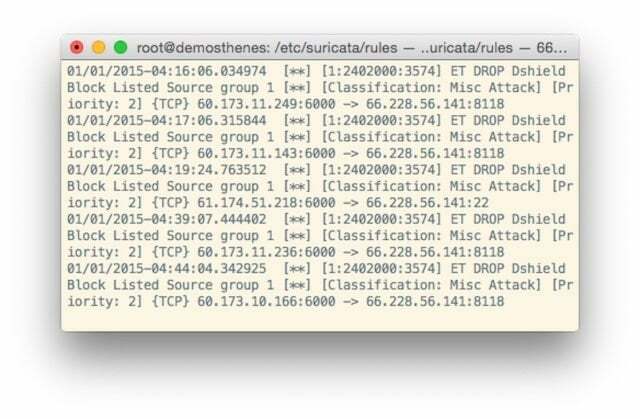
…which means you’re up and running.
Now just run that Oinkmaster command daily (with your tweaked URLs for different rulesets) to keep your rules up to date, and don’t forget to restart Suricata after the updates.
Fin
So I hope this has been helpful, and that enjoy the switch to Suricata from Snort as much as I have.
Notes
This tutorial is for CentOS 6.5, but very little should change for other versions other than where it’s obvious.